Remote Rig & Station Bridge Guide
Operate your station from a phone, tablet or desktop with live receive audio, secure microphone transmission, remote PTT, a full-width waterfall, click-to-tune DX Cluster, rapid tuning, voice-aware scanning, CQ and conversation recording, live broadcasting, and built-in/USB, GoPro, Canon or secure IP-camera video.
Start here
Remote Rig has two working ends. Set up the station end first, then open the remote console on the phone, tablet or computer you will carry with you.
Jump to a section
Install links and platform-by-platform setup
Use these latest package files. Start with the client for your device first, then complete station-side setup in the next section.
Remote Rig setup by platform
- Android: download and install the APK directly, sign in, and open Remote Rig. Allow mic/camera permissions and verify the Radio tab opens with station status connected.
- Windows: run the EXE as your normal user (run as admin only if installer prompts for firewall or driver access). On first run, choose Keep Me Signed In and allow local microphone/speaker access when prompted.
- Linux AppImage: download, then run
chmod +x HamRadioList-Remote-Rig-Linux-1.0.0-x86_64.AppImageand launch it from terminal or file manager. If startup is blocked, ensure execution permission and no read-only mount restrictions. - Linux DEB: run
sudo dpkg -i HamRadioList-Remote-Rig-Linux-1.0.0-amd64.deb, then open from Applications or terminal. If dependencies fail, runsudo apt -f installafter the message. - Linux tar.gz: extract and run the included executable, then keep the folder structure so config/cache files remain stable across restarts.
Station Bridge setup by platform
- Any radio: in Station Bridge, pick your radio in the Radio list (Yaesu, Icom, Kenwood, Elecraft, FlexRadio, or Other radio (Hamlib rigctld) for any other CAT radio), then choose its CAT port and baud rate. Icom radios fill in their CI-V address automatically. The Windows version updates itself automatically from 2.0.13 onward.
- Windows: install HamRadioList-Station-Bridge-Native-Setup-2.0.20, then log in with your station account. Leave Start with Windows, Reconnect and restore automatically, and Restore Share Frequency & Live Radio enabled. After Windows sign-in, the bridge waits for the saved FT-710 CAT and USB audio devices, reconnects automatically, captures the FT-710 at its native USB audio rate, recovers a stalled input, and refreshes Live Radio TURN credentials before they expire so long-running broadcasts keep delivering audio to new listeners.
- Linux DEB: run
sudo dpkg -i HamRadioList-Station-Bridge-Linux-2.0.23-amd64.deb, confirm no package dependency prompts remain, and launch Station Bridge before opening Remote Rig. - Linux tar.gz: extract, grant execute permission to the included launcher, then launch from terminal and keep it open during operating sessions.
/assets/downloads/ in cPanel before opening support ticket.
How the connection works
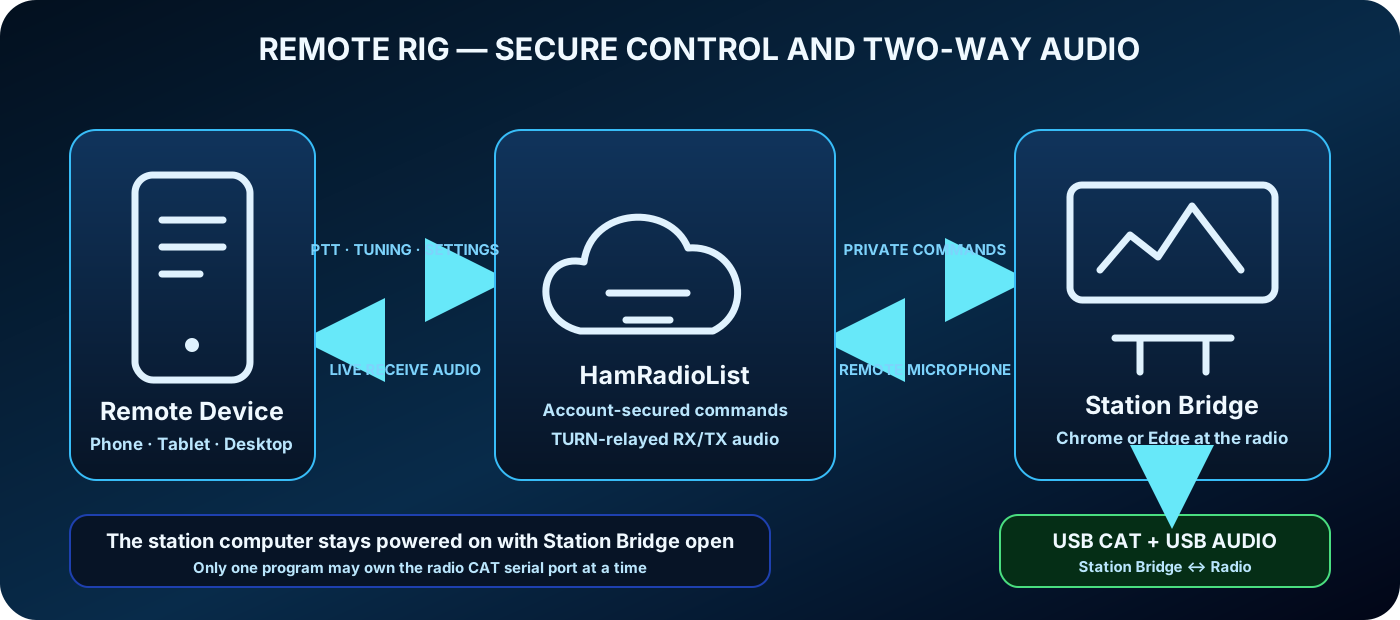
Account-secured radio commands travel through HamRadioList. Receive audio and the remote microphone use the secure real-time media path, with turn.hamradiolist.com available as the authoritative relay when a direct connection is not suitable.
What the system can do
Use a phone or desktop microphone to transmit through your radio.
Listen through the device speaker, computer output, AirPods or supported Bluetooth audio.
Save a custom name, frequency and mode under your account.
Set mode, set frequency, run the tuner and watch a real-time progress popup.
Record and preview CQ audio through the selected speaker, then transmit it through the proven TURN microphone path.
See incoming and transmit audio activity immediately.
Pull live frequency, mode and band into Add QSO through Connect via Remote.
Select microphone and receive output devices, including supported Bluetooth profiles.
The incoming-audio FFT fills the complete frequency-display background while the VFO readout and controls remain overlays.
Step rapidly with the arrow controls or scan a named block. Likely human speech holds the station for five seconds; steady static is ignored.
Filter live worldwide spots inside Remote Rig. Selecting a station switches to Radio and tunes the connected rig automatically.
Record the remote microphone into voice slots 1–5 and transmit the selected radio-stored message over the air.
Save the live receive-audio stream privately to your account and replay it through the selected speaker or headset.
Use a built-in/USB webcam, GoPro Webcam, Canon EOS Webcam Utility, or a browser-compatible secure IP-camera feed from Remote Rig or Station Bridge.
Station computer setup — one-time setup
Connect the transceiver to the station computer using its USB data/audio connection.
Close TopCat, WSJT-X, JS8Call, FLRig, rigctld, CuteCom and duplicate Station Bridge tabs. Only one program can own the physical CAT serial port.
Use current Chrome or Edge on the radio computer and open Station Bridge. For your own station, choose Use My Logged-In Account. A private authorization is only required for a different account or a dedicated station arrangement.
Click Start Station Bridge and approve the correct radio serial interface when the browser asks. When Standard and Enhanced ports are shown, the CAT-control interface is commonly the Enhanced port. The configured CAT rate must match the radio.
Choose the radio receive-audio input and radio transmit-audio output. Transmit audio must be routed to the radio USB audio device, not the station-computer speakers.
Use Test Selected TX USB Output. The local one-second tone verifies the computer can route remote speech to the radio USB transmit input. It does not key the transmitter.
In Broadcast Settings, choose Built-in / USB, GoPro Webcam, Canon EOS Webcam Utility, or IP camera. Use the detailed camera directions below before turning Broadcast Live on.
The bridge maintains CAT ownership, the secure command queue, TURN audio, heartbeat, automatic audio repair, camera fallback and the private remote session.
dialout. If Chrome can see a port but cannot open it, another process may own it. Close that process, disconnect/reconnect USB and try again.Connect from a phone, tablet or desktop
Camera setup — Remote Rig and Station Bridge
The same four camera-source choices are available in Remote Rig → Settings and in Station Bridge → Broadcast Settings. Remote Rig is useful when the operator wants to appear from the phone or remote computer. Station Bridge is the station-side fallback camera.
live.php viewers and screen recording. When the remote camera stops or disconnects, the prepared Station Bridge camera resumes automatically.Built-in or USB webcam
- Connect the webcam before opening the page.
- Choose Built-in / USB webcam.
- Press Detect / Start Camera and allow camera permission for HamRadioList.
- Select the correct named camera input and confirm the preview moves.
GoPro Webcam
- Connect the supported GoPro to the computer by USB and start its Webcam mode/software so the operating system exposes GoPro Webcam as a camera.
- Close another application if it already owns the GoPro video input.
- Choose GoPro Webcam, press Detect / Start GoPro, and approve browser camera access.
- Select the input whose name contains GoPro. If it is missing, start Webcam mode first, reconnect USB, then refresh the camera list.
Canon EOS camera
- Install and start Canon EOS Webcam Utility, connect the supported Canon by USB, power it on, and place it in the appropriate video/movie mode.
- Close camera-control or meeting software that is already using the Canon feed.
- Choose Canon EOS Webcam Utility, press Detect / Start Canon Camera, and allow browser access.
- Select the Canon/EOS Webcam input and verify the preview. If only a placeholder appears, restart the Canon utility and reconnect the camera before refreshing.
Secure IP camera
- In the IP camera or its gateway, enable a browser-playable HTTPS HLS, MP4, MJPEG or snapshot feed.
- Choose IP camera — secure HTTPS feed.
- Paste the complete HTTPS feed or secure token URL. Do not put a username or password inside the URL.
- Press Test & Use IP Camera. The preview must work before starting the public broadcast.
rtsp:// feeds from this secure page. Use the camera's HTTPS gateway or an HTTPS restreaming gateway. MJPEG/snapshot canvas relay also requires the gateway to allow CORS. Insecure HTTP is blocked to prevent mixed-content exposure.Where the selected video appears
On Live Operators, landscape keeps the radio frequency/waterfall and camera side by side; portrait stacks the frequency above the camera. The viewer's Change View choice remains selected through status refreshes. Remote Rig screen recordings include the selected remote camera when it is enabled.
Using PTT
Press and hold PTT, speak, and release when finished. The already-armed microphone stream passes through the secure TURN/media path to Station Bridge, then to the selected radio USB transmit-audio output. The transmit meter should respond immediately, CAT should key the radio quickly, and receive audio should return after release.
Never press PTT until the Audio tab confirms the microphone and Station Bridge transmit route are ready. PTT is intentionally blocked when the radio audio route cannot be verified.
Radio tab controls
Tap a frequency digit to step it upward; press and hold a digit to move downward. The readout sits over the live receive waterfall.
Select 100 Hz, 1 kHz, 5 kHz or 10 kHz, then tap or hold the up/down arrow for accelerated tuning.
Enter a start, end, step and dwell time, or save a named block. Voice-shaped, changing audio holds for five seconds while broad steady static is rejected. Check Loop forever to wrap to the start until Stop is pressed; leave it unchecked for one pass. Starting PTT pauses scanning and preserves the last tuned frequency.
Band, mode, signal, link state and the S-meter update from the active radio connection.
DX Cluster tab — one-click remote tuning
The branded DX Cluster tab sits directly beside Radio and uses the site's live spot feed without leaving Remote Rig. Search by callsign, country, spotter or comment; filter by band or mode; or use the quick band buttons.
- Keep Station Bridge and radio CAT online.
- Open DX Cluster and wait for the green live-feed indicator.
- Tap a DX callsign, its frequency, or Tune Radio.
- Remote Rig immediately returns to the Radio tab, stops an active scanner if necessary, and sends the exact spot frequency to the connected rig. A compatible reported mode is also selected when available.
Saved frequencies and automatic tuner
The Saved Frequencies area appears in the Tune tab. Create an entry with a name, frequency and mode, or use the current radio values. Selecting an entry automatically sets mode, sets frequency, starts the antenna tuner and shows live progress. Entries can be edited or deleted.
Recorded CQ calls
CQ Voice Memory — FT-710 SD card
- Install a usable SD card in the FT-710 and start Remote Audio.
- Select radio voice-memory slot 1–5.
- Press Record CQ, speak into the selected remote microphone, then press Stop. The radio stores the message in the selected slot.
- Press Transmit On Air only when the frequency is clear and you are legally permitted to transmit. Stop ends radio voice playback immediately.
Saved CQ calls — browser/account audio
The saved-CQ recorder captures a short CQ message or accepts an MP3/WAV upload, stores it privately under the logged-in account, lets the operator preview or delete it, and sends it through the verified media/TURN microphone path when transmitted. Uploaded audio is checked for a supported format, usable duration and audible content.
Conversation Recorder — received radio audio
- Turn on Listen to Radio and confirm you can hear the receiver.
- Enter a useful recording name and press Record Conversation.
- Press Stop & Save. The recording is stored privately under the logged-in account.
- Select a saved conversation and press Play Recording; playback uses the selected speaker or headset and restores live listening afterward.
Add QSO integration
The complete branded QSO Contact Logger is embedded full-width below PTT in the Radio tab, including callsign lookup, live frequency/mode/band, notes, QSL tools and the last 50 contacts. The standalone Add QSO page remains unchanged; its Connect via Remote option can also pull the active radio values.
Optional live broadcasting from Station Bridge
Station Bridge contains Broadcast While Operating Remotely. It publishes radio RX audio, transmitted operator voice, real-time frequency/mode/meter data, the vertical waterfall, optional camera video and a formatted viewer overlay. This broadcast switch is separate from Remote Rig control.
- Set a broadcast title and choose Landscape for frequency and camera side by side or Portrait for stacked viewing.
- Enable camera video and choose Built-in/USB, GoPro Webcam, Canon EOS Webcam Utility, or secure IP camera.
- Start and verify the camera preview using the instructions in Camera setup.
- Prepare the optional viewer overlay and press Update Live Overlay.
- Turn on Broadcast Live, then copy the public live link.
Troubleshooting
| What you see | What to check | What to do |
|---|---|---|
| Serial port cannot open | Another program or tab owns CAT | Close TopCat, WSJT-X, JS8Call, FLRig, rigctld, CuteCom and duplicate bridge tabs; reconnect USB and start Station Bridge again. |
| Receive audio is silent | Station input, remote output and receive meter | Use Enable / Refresh Audio Devices, select the radio USB receive input, and reselect the remote speaker/headset output. |
| PTT keys but no voice | Station transmit USB output and Audio-tab readiness | Select the radio USB transmit output, run its local test, restart Remote Audio, and do not transmit until the microphone route reports ready. |
| CQ voice memory says Unknown command | Station Bridge page/controller version | Hard-refresh Station Bridge, restart it, and retry. The current bridge recognizes the FT-710 voice-memory compatibility envelope. |
| Conversation recorder cannot start | Live receiver stream | Press Listen to Radio first and confirm you can hear the radio before recording. |
| DX spot opens Radio but does not tune | Station Bridge and CAT readiness | Confirm the bridge is online and the Radio tab shows a live frequency, then return to DX Cluster and select the spot again. |
| AirPods output works but microphone is missing | Operating-system Bluetooth profile | Enable the hands-free/headset input profile, then refresh microphones. Some systems expose only high-quality playback until the headset profile is enabled. |
| GoPro or Canon is not listed | Webcam mode/utility and another application using it | Start GoPro Webcam mode or Canon EOS Webcam Utility first, close other camera apps, reconnect USB, allow browser camera permission, and press Detect / Start again. |
| IP camera rejects the URL | Protocol, credentials and feed format | Use a complete HTTPS HLS, MP4, MJPEG or snapshot URL. Raw RTSP, insecure HTTP and embedded username/password URLs are intentionally rejected. |
| IP camera loads but cannot broadcast | HTTPS gateway CORS and browser playback support | Enable CORS on the camera gateway for MJPEG/snapshot relay, or use a browser-playable HTTPS MP4/HLS gateway supported by the current browser. |
| Station camera disappears when remote camera starts | Normal camera priority handoff | Remote Rig camera intentionally has priority. Turn it off or disconnect it and the prepared Station Bridge camera will resume automatically. |
| Temporary database busy | Duplicate pages and automatic retry | Leave one Remote Rig and one Station Bridge open and allow the built-in retry to finish. |
| ICE candidate warning 701 | Network restrictions | The TURN relay remains authoritative. If audio does not connect, try another network and confirm Station Bridge has its audio relay settings. |
Important operating notes
- The station computer must remain powered on, online and connected to the radio.
- Only transmit where permitted by your licence and local regulations.
- Keep the station in a condition where remote transmission can be safely controlled.
- Internet latency makes remote control unsuitable for some time-critical operations.